Friday, May 9, 2014

Pink Flamingo

Bryan Yerian
Embrace
24" x 8" x 5"
ceramic
2014

Ceramic hand-built abstract form with press-molded flamingo

Low fire cone 04 glazed:
glossy pink flamingo,
metallic black with white glossy dots.

Wall-hanging

Thursday, June 21, 2012

Aluminum Casting and Some Common Defects


 Here is our 900,000 BTU #40 Speedy Melt metal furnace right before we pulled the silicon carbide crucible of molten aluminum.  Preheating the ingot molds and a few ingots of aluminum.  Everything has to be hot when casting metal.

Metal has pours that store moister and if tools or metal to be melted isn't preheated the water will turn to steam upon contact with molten metal causing all kinds of mayhem in the foundry.

It always comes down to the last 10 seconds!
We have a 12" deep sand pit.  I use 55gal steel barrels sections as flasks to hold up the shells for the pour.
These shells were preheated to 1200F and poured hot.  A mistake.  After this pour I realized the shells were too hot and kept the metal molten too long.  I now preheat my shells to 900F for Aluminum and 1400F for Bronze. This allows the metal to flow sufficiently, yet freezes off the metal quickly.  A good thing if a shell is leaking!

I had a terrible time casting these.  There were leaks, bubbling, core breakage, cold shut.
   
 As the aluminum cools it shrinks and as it shrinks it cracks the shells.  When the shells crack like this I begin chipping out the metal casting.


 The Defects
 Exhibit A:
Hydrogen porosity in the center of the pattern.  Molten Aluminum reacts with water vapor (H20) in the atmosphere.  The molten aluminum combines with the Oxygen and leave 2 Hydrogens roaming freely in the aluminum.  That's why aluminum must be degassed prior to pouring.
I did degass this pot, just not enough.  We degas with Dry Nitrogen or Pure Nitrogen.  The nitrogen creates a low pressure gas bubble in the aluminum.  Hydrogen is a high pressure gas and is tricked into entering the low pressure nitrogen bubble and thereby exiting the aluminum within the nitrogen.
Next time I cast aluminum I degassed for a longer period as the aluminum cooled in the crucible prior to pouring and got rid of the hydrogen porosity.

I also poured the aluminum too hot so it sat molten in the shells too long allowing the hydrogen to migrate and concentrate into patches. 
 As aluminum solidifies it rejects the hydrogen. The center of my piece stayed molten the longest and solidified last allowing the hydrogen to concentrate into a patch of porous metal.

Here is a closeup of the hydrogen gas patch.  If you look closely you can see the crystal formation of the metal.


 Exhibit B:
Cold Shut.  Never walk away from a shell right after it gets poured.  I forgot this detail and began pouring ingots then realized my shell had a leak and then didn't have enough metal to refill the shell.  I had to remelt new metal and cast over the cooled metal.  I sucessfully filled the shell, however the metals did not fuse together.

 Exhibit C:
Here is my worst porosity cavity.  As I poured this shell the aluminum in the cup was burping and bubbling.  When I saw that I knew I was going to be greeted by this sight.  This shell again received aluminum that had alot of hydrogen disolved it the metal.  As the aluminum solidified it pushed it out and up the shell towards the cup.


Exhibit D:
Here's another closeup of the skin layer porosity I received in a narrow section of one of the shells.  It is actually located just below the picture above on the casting.


These defects were all fixed by welding and sanding the surface smooth.

Out of the Slurry Tank and into the Wax Burnout Kiln

Our new ceramic shell slurry tank.

The Shopping list:

We mounted the motor in a steel box for protection against slurry splashes.  The shaft should enter the tank at an angle off center to keep the slurry from osilating too much.
We mounted the percentage timer next to the motor with an outdoor switch cover over the controls.


We had success with minimal settling with a timer setting of 4 minutes on and 4 minutes off.  The slurry got warm from the friction but not bad enough to cause evaporation.  The only time it got hot was when we mixed new batchs of slurry for a 2hr continuous cycle.  The shells ended up being very strong, had excellent detail and had minimal cracking thru dewaxing.


 The first two coats we use a thicker primary slurry mix using very fine silica powder in the colloidal silica based slurry and a fine grade silica sand for the stucco.
 We check the viscosity of the slurry using a Zann cup pictured in the bottom left of the photo.
 After the second coat we move to a courser grit sand for the stucco and a courser powder in the slurry.
The slurry mix is also thinned dramatically so as to allow the shells to develop the pores needed for the shells to breathe.
More pores in the shell layers equals less necessary venting as with standard investment procedures.
 I gate many pieces using direct gating theory.  The sprues feed directly to the pattern and also act as vents, but this is reliant on proper metal feed rate too not over feed so the piece burps air pressure through the stream of metal.  I look for a steady flow as I cast
Fourth dip: wrap with fiberglass strand
 Done:
The final dip is done without a sand coat so as to seal the shells
6-8 dips for large pieces
4-6 for small and medium size pieces.

Also, the weight of the metal to cast plays a role in determining shell thickness.
 A student of mine doing the terrible job of grinding off the top of their cups, preparing for burnout.
We really need to make a filtered cup grinder.  Can you see it?  I can.  Humboldt State Sculpture had one, so shall I.
 A cup ground down  to separate the outside shell from the inside shell of the cup.  This part of the cup should not be there, but can be used for other many things such as:
  • shell repairs,
  • another cup if one is lost,
  • a tiny crucible,
  • thrown into a crucible full of molten aluminum to stop the metal from oscillating in the furnace, etc.
 Shells suspended in the wax burnout kiln...
 Actually a high-tech piece of equipment!

The Shopping List:
  • 90,000 BTU forced air gas burner
  • 1 1/4 55 gal steel drums:     (1 for the fire chamber and 1/4 for the water troff to catch the melted wax.)
  • Angle iron for legs
  • Steel sheets for baffles
  • 4' steel bar
  • Enough kaowool to line the barrel
  • Ceramic buttons and bailing wire to tie back the wool.

A view at night.  It always looks more dramatic this way.

 The shells are pulled out and loaded (cup up) into another kiln (in our case an electric) and heated to 1550 F and held at that temp for 2 hours.  This makes the shells stronger and burns out the rest of the stubborn and problematic carbon residue.


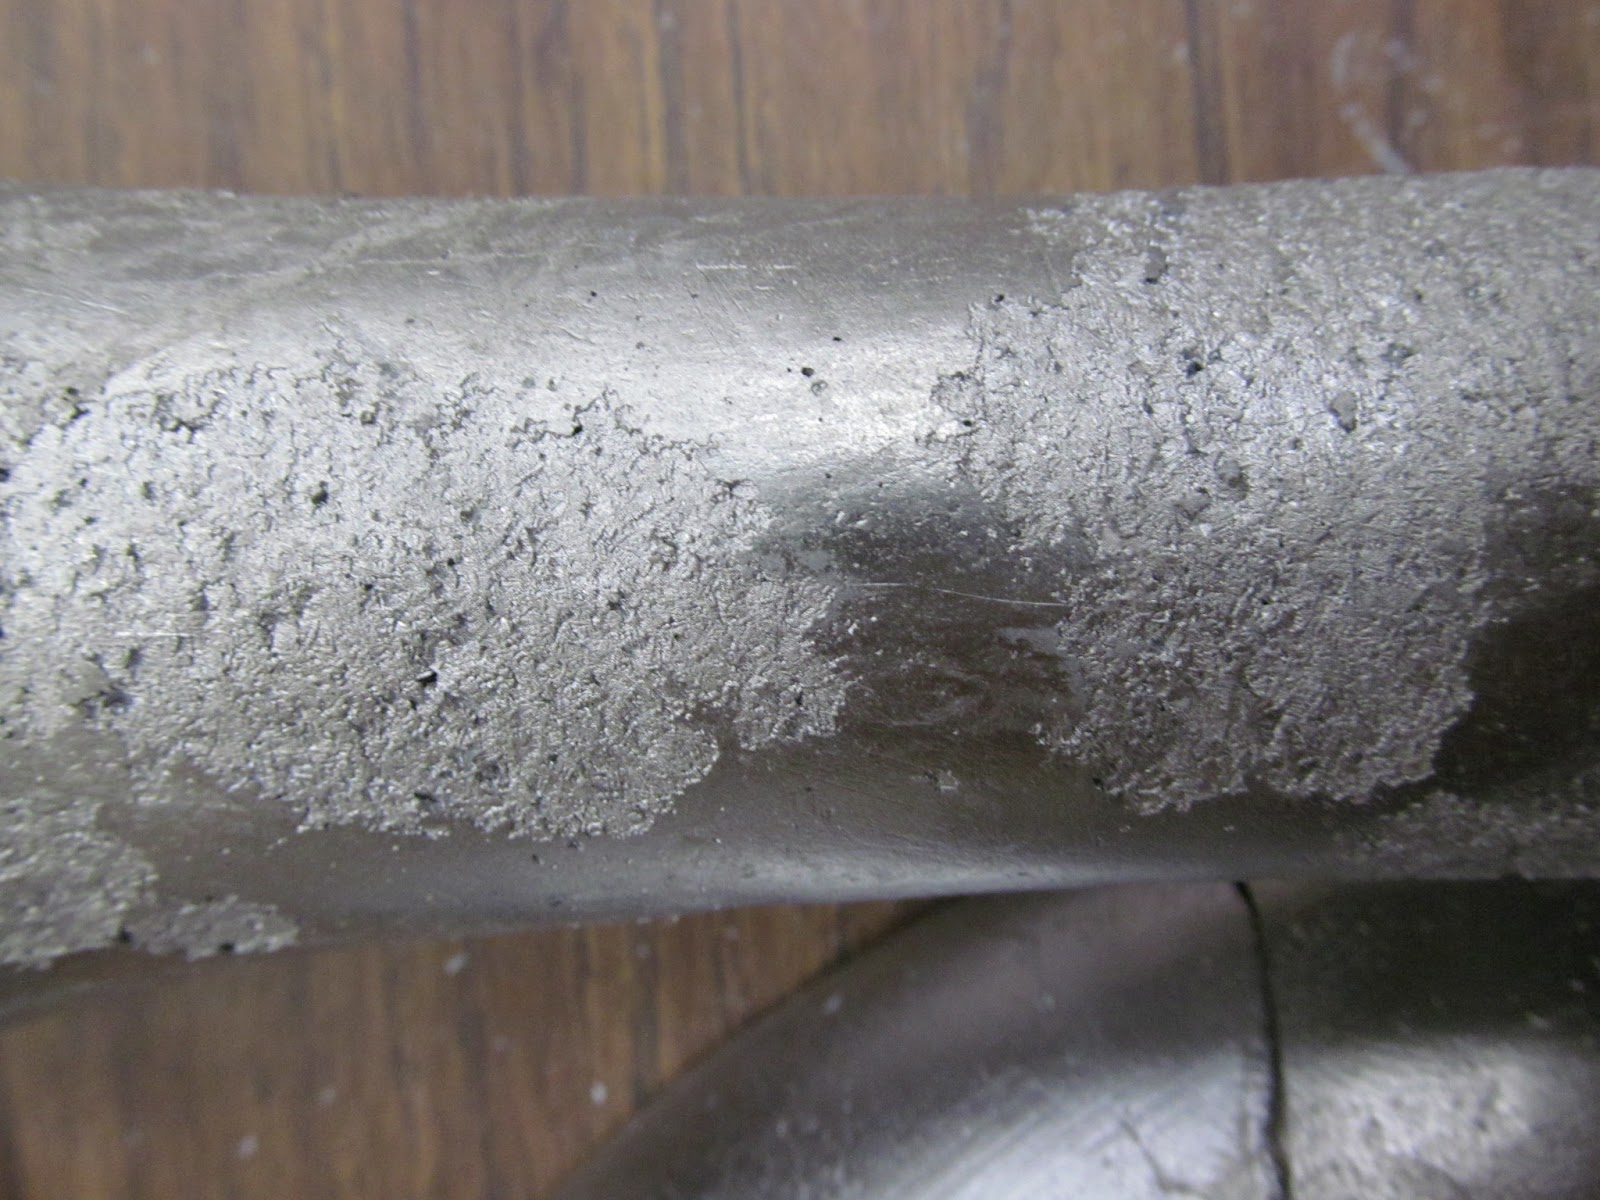
A closeup photo of one of my shells after the final kiln firing.  Can you see the crack that needs to be filled?

Something I will do next time to cut down on the shell cracking as a result of wax expansion in the burnout kiln.  I will go full blast with the burner right away, no babying up in temp, straight to red.  This flash melts the wax layer that is up against the shell before it has time to expand and cause a crack. 
 Using kiln cement to patch holes and cracks.
 Back in the kiln to be heated to 900F for the aluminum casting extravaganza.

Wednesday, May 23, 2012

Lost Wax Casting and Wax Working; Sprues and Gating


 To cast this piece, I had to paint in multiple layers of molten wax to achieve the thickness I wanted.  For bronze or aluminum casting I make my wax pattern wall thickness between 3/16" to 1/4".

A trick I do to check wax for proper thickness is hold the wax up to a light and if you can see light thru the wax it's too thin.  I also use a wax mixture  between Red Casting Wax and Brown Microcrystalline Wax, so this ruke may not apply to lighter colored waxes


 This is a photo of the other two wax sections as they are coming out of the plaster molds.


A closeup after I patched the bubbles with utility patch wax and then polished the wax using a nylon window screen and mineral spirits.  Lighter fluid works great too.
 Another shot of the polished and patched section pre-gating.

 A few views of the piece as it will be in the end.  It really looks like melted chocolate which is dripping down a wall and shelf.
 The top view of the "butt crack" middle section.
The back view showing the gating system ans sprues.  This system is a mix of direct and indirect metal casting gating systems.


This is an article in the Tahoe Daily Tribune, which features our foundry:
Hard work Metal casting and fabricating classes at college turn out works of art

Thursday, May 3, 2012

Ceramic Press-Molded Tire


 I enjoy the seam lines.  How the slip oozes out and looks like a weld on steel.   It is a record of the substitution.  The process it has gone through.

I made an 8 piece plaster mold of an old tire I found in my back yard.  A Winston Californian 1 20570R14.  Seemed like the perfect object at the time to represent a memory.
 Notice the edges of the clay slabs, I made flanges to assist in joining the press-molded shapes, as well as act as a buttressing system to add support to the final clay form.

In the lower right of the picture is a maquette of the final sculpture.

A tire swing leaning against a wall, discarded, oozing a viscous substance from its central core.


I worked on an egg crate covered in plastic.  First made the attachments to connect the sidewall of the tire; getting ready to connect tread section #1.  Scored and slipped both surfaces and wiggled and squeezed the attachments to ensure proper weld.

The slip I use is the consistency of a "milkshake". 

Added an extra buttress in the middle of each sidewall section for added support.
 Tire after attaching all four tread sections. 
 Connected section #1 of the other sidewall.  This was tough to squeeze the flanges together as my arm doesn't bend this way.


Finally closed the tire up and am  hoping this connection is good as I misplaced my elf that day who lives inside closed forms to squeeze the final flange seams together.

Add more as I make it.

Thanks for visiting,
Bryan Yerian